What Is An Embroidery Size Chart
An embroidery size chart is a guide that shows the right sizes for embroidery designs. It helps you decide how big or small your design should be for different items, like shirts, hats, or bags. For example, a big logo might look good on a jacket but not on a small cap. The chart helps you make sure your embroidery fits well on the item you’re working on. It also helps avoid mistakes by showing you the best size ranges for each project.
Using a size chart is helpful for both beginners and experienced embroiderers. It saves time because you won’t have to guess the right size. Instead, you can follow the chart and get it right the first time. Whether you’re making a gift or selling your designs, an embroidery size chart ensures that everything looks professional.
How Size Charts Improve Accuracy
Size charts improve accuracy by giving you exact measurements for your embroidery designs. Instead of guessing, you can follow the chart and place your design correctly. This is especially important for projects where precise placement matters, like logos on uniforms or names on towels.
When you follow a size chart, your embroidery will fit perfectly on the item. This makes your finished product look polished and professional. Without a size chart, you might end up with a design that is too big or too small, which can look messy.
Choosing The Right Embroidery Size
Choosing the right embroidery size is important for making your designs look good. The size you pick depends on the item you are working on and the design itself. For example, a large design might look great on a big tote bag but too crowded on a small t-shirt pocket.
To choose the right size, think about where the embroidery will go. Is it the main focus, or just a small detail? Big designs grab attention, while small designs add a subtle touch. Use the size chart to match the design with the item’s size and shape.
Standard Vs. Custom Size Charts
There are two types of size charts: standard and custom. Standard size charts have common sizes used for many projects, like logos or text on clothes. These charts are easy to follow and work well for most embroidery jobs. For example, a standard size for a chest logo on a polo shirt is usually 3 to 4 inches wide.
Custom size charts are made for special projects. They are useful when you have a unique item or a very specific design. If you’re embroidering on an unusual surface, like a curved bag or a small piece of fabric, a custom chart helps you find the right size that fits perfectly.

Key Elements In Size Charts
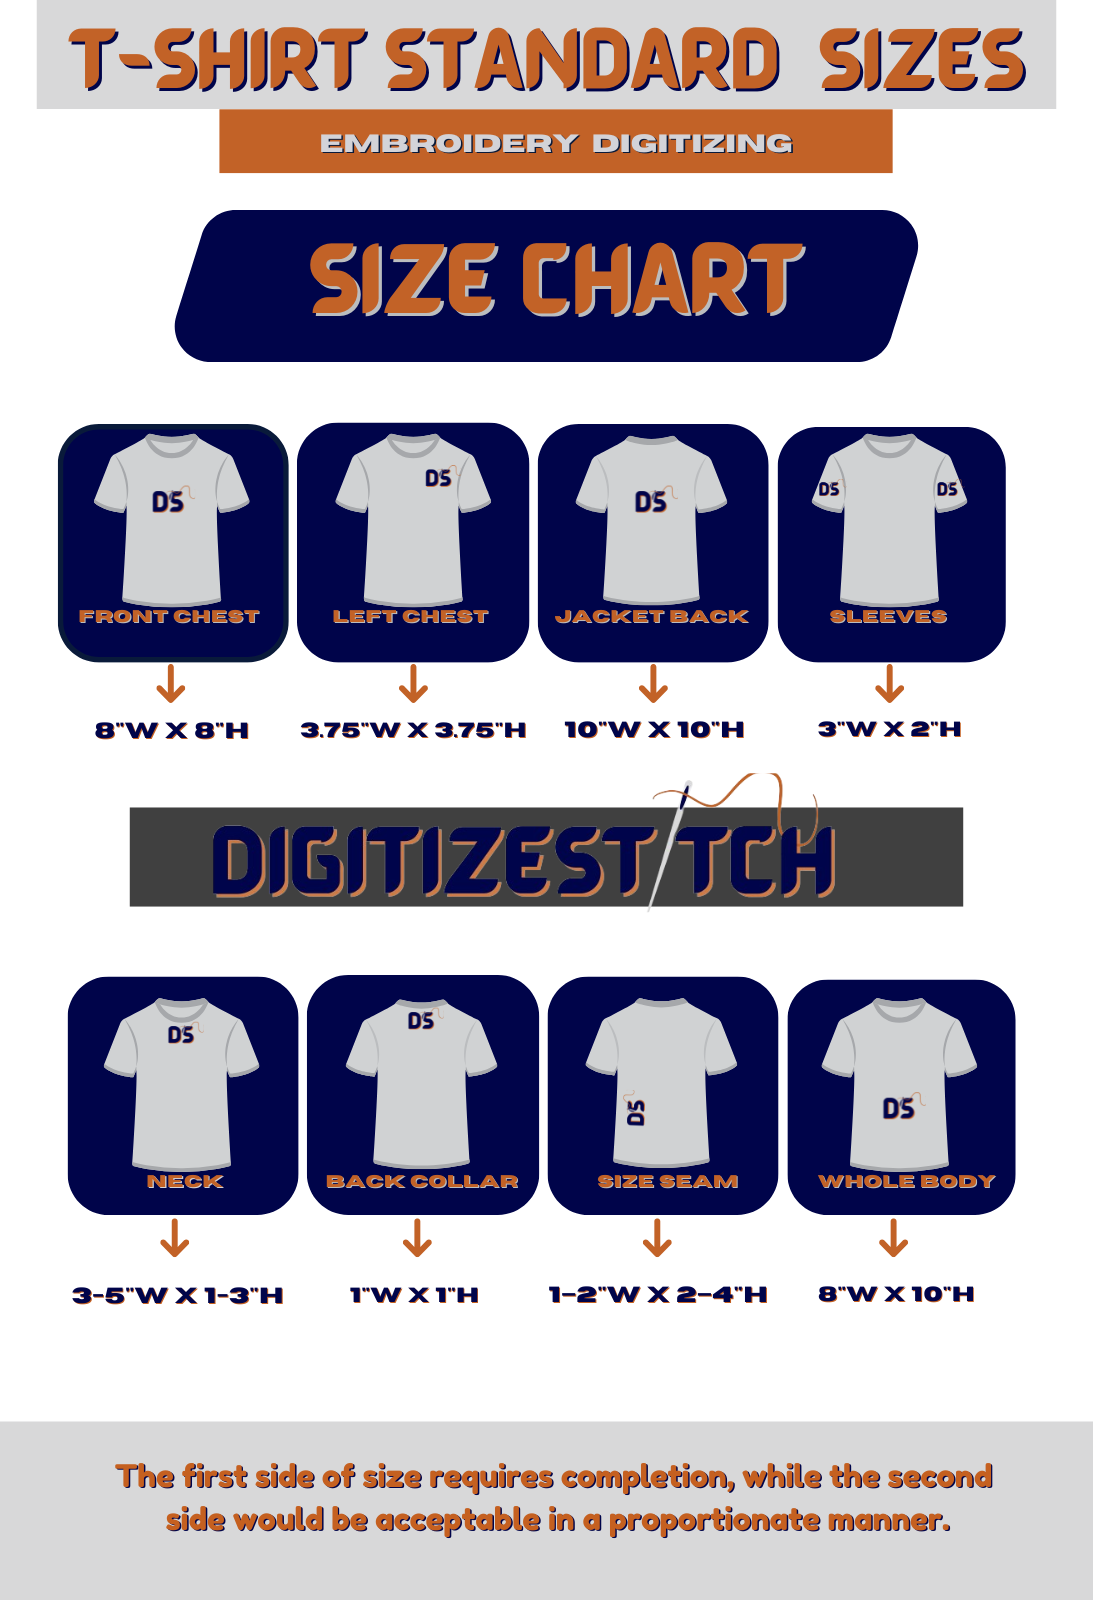
An embroidery size chart includes key elements to help you pick the right size. First, it shows the recommended width and height for different items. For example, it might suggest 2 to 3 inches for a hat logo and 4 to 5 inches for a chest logo on a shirt. Second, it includes guidelines for different embroidery types, like letters or pictures. Some charts also show how to adjust the size based on fabric type, such as stretchy or thick materials.
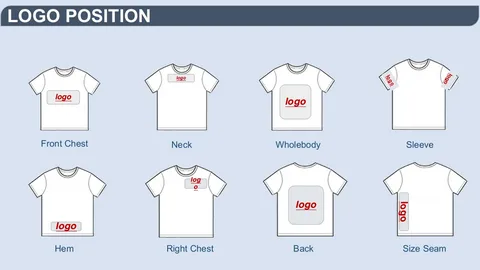
Another key element is the placement guide. This shows where the design should go on the item, like the left chest, sleeve, or back. Placement is as important as size because it affects how the final design looks.
Avoiding Common Sizing Mistakes
Sizing mistakes can make your embroidery look messy or out of place. One common mistake is making the design too big. A design that is too large can overpower the item and make it look crowded. Another mistake is making it too small, which can make the details hard to see.
Another mistake is not considering the fabric type. Stretchy or thick fabrics can affect the size of your design. If the embroidery is too tight on stretchy fabric, it may cause the fabric to bunch up.
Importance Of Proportions In Embroidery
Proportions are how the size of your design fits with the size of the item. Good proportions make your embroidery look balanced and attractive. For example, a large design on a small t-shirt can look awkward, while a small logo on a big jacket can seem too tiny.
Using an embroidery size chart helps you keep the right proportions. The chart shows you the best size for different items, so your design won’t look too big or too small. This is especially helpful when you offer logo digitizing services. Keeping the right proportions makes your designs look professional and well made.
How To Measure Embroidery Areas
Measuring embroidery areas is an important step before starting your design. First, decide where you want to place the embroidery. Then, use a ruler or measuring tape to measure the width and height of that area.
Mark the area with chalk or a removable pen so you can see where the design will go. This helps you avoid placing it too high, low, or off-center. If you’re using designs for machine embroidery, know the exact measurements. Your machine needs them to stitch the design in the right place.
Measuring carefully helps you avoid mistakes and saves time. It also makes your embroidery look more professional. By following a size chart and measuring correctly, you’ll have a better chance of getting your design right.
Tips For Using Size Charts Effectively
Using size charts can make your embroidery projects easier and more successful. First, always keep a printed or digital copy of the chart nearby. This helps you check the correct size when planning your design. Next, practice with small test designs before starting your main project. This helps you see how the size looks on the fabric and adjust if needed. If you are working on different items, like shirts and hats, check the chart for each one to make sure the sizes are correct.
